Capture Your Screen with Snagit: The Ultimate Guide 2025
A comprehensive guide to mastering screen capture with TechSmith's powerful tool
In today's digital world, capturing and sharing what's on your screen has become an essential skill for professionals, educators, and content creators. Whether you're creating technical documentation, developing educational content, or simply trying to explain a concept visually, screen capture tools have revolutionised the way we communicate digitally. Among these tools, Snagit stands out as one of the most versatile and powerful screen capture solutions available.
This comprehensive guide will walk you through everything you need to know about capturing your screen with Snagit, from basic screenshots to advanced recording features. By the end of this article, you'll have mastered the art of screen capture and be well-equipped to create engaging visual content for any purpose.
What is Snagit?
Snagit is a premium screen capture and recording software developed by TechSmith. Unlike basic screenshot tools that come built into your operating system, Snagit offers advanced capturing, editing, and sharing capabilities all within a single application. It allows you to capture exactly what you want—from a simple selection of your screen to a full-page scrolling capture of a website or document.
Available for both Windows and Mac, Snagit has become an indispensable tool for professionals in various fields including:
- Technical writers creating software documentation
- Educators developing visual learning materials
- Customer support specialists creating helpful guides
- Marketing professionals creating visual content
- UX/UI designers sharing feedback on designs

Key Features of Snagit
Snagit offers a robust set of features designed to make screen capture quick, easy, and effective. Here are the standout capabilities that set Snagit apart from basic screenshot tools:
Versatile Image Capture
- Capture specific regions, windows, or full screens
- Panoramic scrolling capture for long pages
- Capture multiple areas of the screen simultaneously
- Timed capture for preparing sequences
Video Recording
- Record screen activity with audio
- Webcam recording for picture-in-picture videos
- Create GIFs from video recordings
- Basic video trimming and editing
Powerful Editor
- Add text, callouts, arrows, and shapes
- Professional blur and highlight tools
- Step tool for numbered instructions
- Smart move for text recognition
Sharing Options
- Share directly to common applications
- Save in multiple formats (PNG, JPEG, GIF, PDF)
- Upload to cloud services
- Copy to clipboard for quick pasting
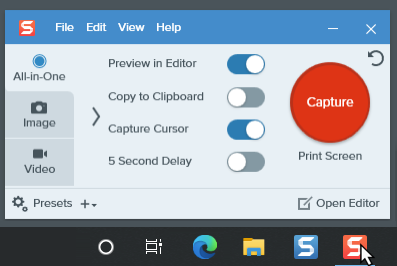
Snagit's user-friendly interface makes all these features easily accessible, even for beginners. The All-in-One capture interface serves as a central hub for selecting capture settings, while the Editor provides everything you need to refine and enhance your captures.
How to Capture Screenshots with Snagit
Taking screenshots with Snagit is straightforward but offers much more flexibility than standard screenshot tools. Let's break down the process step by step:
Basic Image Capture
- Open Snagit and ensure the Image tab is selected in the Capture window.
- Click the Capture button or press the Print Screen key (Windows) or Control+Shift+C (Mac).
- Select the area you want to capture using the crosshairs that appear:
- Click and drag to select a custom region
- Hover over a window and click to capture just that window
- Click the Fullscreen button for a complete screen capture
- Review and edit your capture in the Snagit Editor that opens automatically.
- Save or share your screenshot using the options in the top right corner.
Scrolling Capture
One of Snagit's most powerful features is its ability to capture scrolling content—perfect for long web pages, documents, or code samples:
- Open Snagit and select the All-in-One tab.
- Click the Capture button and select an area within a scrollable window.
- When the All-in-One toolbar appears, click the Scrolling Capture button.
- Use the scroll bar or mouse wheel to scroll through the content you want to capture.
- Click Done when you've finished scrolling.
- Edit and share your scrolling capture in the Snagit Editor.
Timed Capture
Need to capture something that requires setup, like a dropdown menu or hover state? Snagit's timed capture feature is the solution:
- In the Capture window, enable the "5 Second Delay" option.
- Click Capture to start the countdown.
- Set up whatever you need to capture during the countdown.
- When the countdown finishes, select the area you want to capture.
Recording Videos with Snagit
Sometimes a static image isn't enough to explain a process. That's where Snagit's video recording capabilities come in:
Basic Video Recording
- In the Capture window, select the Video tab.
- Configure your settings (microphone, system audio, webcam, etc.).
- Click the Capture button and select the area you want to record.
- Click Record in the video toolbar that appears.
- Perform the actions you want to demonstrate.
- Click Stop when you're finished recording.
- Preview, trim, and share your video in the Snagit Editor.
Creating GIFs from Videos
Snagit makes it easy to create GIFs that can be embedded in documents, emails, or websites:
- Record a video as described above.
- In the Snagit Editor, trim your video to include only the essential content.
- Click the GIF button in the Share menu.
- Adjust settings like frame rate and quality.
- Click Create to generate your GIF.
- Save or share your GIF using the available options.
Enhancing Your Captures with Snagit Editor
Capturing your screen is just the first step. Snagit's Editor provides powerful tools to enhance your images and videos and make them more informative:
Essential Editing Tools
- Arrows and Lines - Direct attention to specific areas
- Text and Callouts - Add explanatory text with or without speech bubbles
- Shapes - Highlight areas with rectangles, ovals, or custom shapes
- Blur - Hide sensitive information
- Crop and Resize - Focus on important elements
- Step Tool - Add numbered steps to create clear instructions
- Stamps - Add pre-made icons, buttons, and symbols
Using Templates for Consistency
Snagit offers templates that help you create consistent, professional-looking documentation:
- In the Snagit Editor, click Create > Image from Template.
- Choose a template that suits your needs (step-by-step, comparison, etc.).
- Add your captures to the template by dragging them from your library.
- Add text and additional annotations as needed.
- Save or share your completed template.
Video Tutorials for Snagit
Visual learners might prefer to see Snagit in action. These tutorial videos provide hands-on guidance for using Snagit effectively:
How to Use Snagit - Beginner Tutorial
Snagit Screen Capture Tutorial (Beginners Guide)
Snagit vs Other Screen Capture Tools
While Snagit is a powerful tool, it's important to understand how it compares to alternatives to make an informed decision:
| Feature | Snagit | Windows Snipping Tool | macOS Screenshot | Greenshot (Free) |
|---|---|---|---|---|
| Basic Screen Capture | ✅ | ✅ | ✅ | ✅ |
| Scrolling Capture | ✅ | ❌ | ❌ | ❌ |
| Video Recording | ✅ | ❌ | ✅ (limited) | ❌ |
| Advanced Editor | ✅ | ❌ | ❌ | ✅ (basic) |
| Templates | ✅ | ❌ | ❌ | ❌ |
| GIF Creation | ✅ | ❌ | ❌ | ❌ |
| OCR Text Recognition | ✅ | ❌ | ❌ | ❌ |
| Price | ~£60 | Free | Free | Free |
While free alternatives like the Windows Snipping Tool or macOS Screenshot may be sufficient for basic needs, Snagit offers significantly more functionality for professionals who regularly create visual documentation or tutorials.
Productivity Tips for Snagit Power Users
To get the most out of Snagit, try implementing these productivity-enhancing strategies:
Create Custom Presets for Common Tasks
Save time by creating presets for your most common capture types:
- Configure your capture settings as desired
- Click the Presets button in the Capture window
- Select "Create a new preset" and give it a name
- Assign a hotkey for quick access
Master Essential Keyboard Shortcuts
- Print Screen (Windows) or Control+Shift+C (Mac) - Start a capture
- Shift+F9 (Windows) or Control+Shift+Space (Mac) - Start/pause video recording
- Shift+F10 (Windows) or Control+Shift+V (Mac) - Stop video recording
- G - Toggle video guides when selecting a capture area
- A - Select the arrow tool in Editor
- T - Select the text tool in Editor
Organize Your Captures with Tags
Keep your captures organized and easily searchable:
- In the Snagit Editor, open the Library panel
- Right-click on a capture and select "Add Tags"
- Create categories like "Tutorial," "Client Project," or "Website Updates"
- Use the search function to quickly find specific captures
Frequently Asked Questions
What are the shortcut keys for Snagit?
The main capture shortcut is Print Screen (Windows) or Control+Shift+C (Mac). For video recording, use Shift+F9 to start/pause and Shift+F10 to stop on Windows, or Control+Shift+Space and Control+Shift+V respectively on Mac.
How long can you screen record on Snagit?
While there's no absolute limit, TechSmith recommends keeping recordings under one hour to avoid potential issues. For longer recordings, consider breaking them into shorter segments and combining them later.
Is Snagit better than Snipping Tool?
Snagit offers significantly more functionality than the Windows Snipping Tool, including scrolling capture, video recording, extensive editing capabilities, and templates. For casual use, Snipping Tool may be sufficient, but for professional documentation, Snagit provides much greater value.
What file formats can I save my captures in?
Snagit supports numerous image formats including PNG, JPEG, GIF, BMP, and TIFF. Videos can be saved as MP4, and you can also export captures as PDF files or create animated GIFs from video recordings.
Is there a free trial for Snagit?
Yes, TechSmith offers a fully functional 15-day free trial of Snagit that includes all features. This gives you a chance to evaluate whether Snagit meets your needs before purchasing.
Can I have multiple versions of Snagit installed?
You can have multiple major versions of Snagit installed simultaneously (e.g., Snagit 2024 and Snagit 2025), but you cannot have multiple minor versions of the same major release (e.g., Snagit 2025.1 and Snagit 2025.2).
Conclusion: Elevate Your Screen Capture Experience with Snagit
Capturing your screen with Snagit opens up a world of possibilities for creating clear, engaging visual content. Whether you're documenting processes, creating tutorials, or simply trying to explain something visually, Snagit provides the tools you need to communicate effectively.
Unlike basic screen capture utilities, Snagit combines powerful capture capabilities with robust editing features, allowing you to create professional-looking visuals with minimal effort. The ability to capture scrolling windows, record videos, and create animated GIFs makes Snagit particularly valuable for content creators and technical communicators.
While the price tag may seem steep compared to free alternatives, the productivity gains and enhanced quality of your visual communications more than justify the investment for regular users. The time saved on creating and editing captures alone can quickly offset the cost.
Whether you're a beginner just starting out with screen captures or a seasoned professional looking to streamline your workflow, Snagit provides an intuitive, feature-rich solution that adapts to your needs. By mastering the techniques covered in this guide, you'll be well on your way to creating clearer, more engaging visual content that effectively communicates your message.
Remember, a picture is worth a thousand words, but a well-annotated screenshot is worth even more.


No comments:
Post a Comment